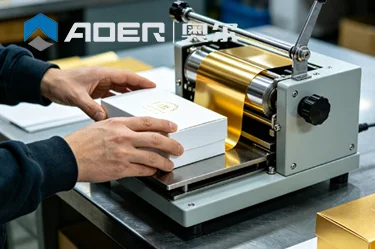
The bride’s mother opens the envelope. Her eyes go straight to the foil-stamped names—gold, raised, flawless. Then she runs a finger over the letters. No roughness. No bleeding. That moment costs the couple nothing extra, but it’s why they paid a premium for custom invitations.
Now imagine the opposite: the same envelope, but the foil flakes off at the edge of the “R” in Richard. Or worse—the heat has puckered the thick cotton paper around the monogram.
I’ve seen both outcomes in actual print shops. And the difference between them rarely comes down to the price of the machine. It comes down to understanding how luxury substrates behave under heat and pressure.
Here’s a counterintuitive truth that surprises many newcomers: Luxury papers—cotton rag, handmade linen, thick textured board—are actually more sensitive to pressure than standard cardstock.
A standard 300gsm coated sheet can take 2-3 tons of force without visible damage. But a 100% cotton invitation paper? Anything above 1.5 tons starts crushing the fibers. You’ll see a subtle indentation around the foil—a “halo” effect that makes premium materials look cheap.
Yet many operators, seeing incomplete foil transfer, instinctively crank up the pressure. Wrong move.
The real fix is often temperature dwell time. High-end papers need slightly lower temperatures with longer contact—sometimes 0.6 to 0.8 seconds instead of the usual 0.3 to 0.4. This gives the foil adhesive time to bond without scorching the substrate.
Luxury rigid boxes (think iPhone packaging or high-end watch boxes) present a different challenge: size consistency.
Most premium boxes use chipboard wrapped in specialty paper. The die-cut chipboard pieces can vary by 0.5mm from sheet to sheet. That’s fine for assembly—but it’s a nightmare for foil stamping because the stamping position needs to shift slightly to stay centered on each box.
Manual registration adjustment for every box isn’t practical. The solution is either:
A semi-automatic indexing system that lets you nudge the foil position between boxes
Or better, a vision-registered automatic feed that reads pre-printed marks and adjusts stamp position on the fly
Without one of these, you’ll waste 5-10% of your luxury boxes on off-center foil. At $3-8 per box for materials alone, that adds up fast.
Standard foil stamping assumes the entire plate is the same temperature. For most commercial work, that’s fine.
But luxury packaging often mixes materials on the same sheet. A cosmetics box might have:
A matt laminate area (needs lower heat to avoid bubbling)
A soft-touch coating (needs medium heat but very high pressure)
And the bare paper inside the flap (needs standard settings)
A single temperature setting will fail on at least one of these zones.
This is why multi-zone temperature control is non-negotiable for serious luxury work. Machines that can run the center zone 10°C cooler than the edges allow you to stamp over mixed substrates without compromising any of them.
Here’s a detail that even some experienced operators overlook: Paper grain direction affects how foil adheres.
When you stamp across the grain, the paper fibers lift slightly under heat, creating micro-gaps that foil the can’t bridge. The result looks like an incomplete transfer—mottled, spotty areas—even though temperature and pressure are correct.
The fix is simple: Always stamp parallel to the grain direction on premium papers. And when a design forces you to stamp across the grain, increase your dwell time by 20-30% to allow the fibers to settle.
How to check grain direction without tools? Take a sheet, wet one edge lightly. The paper will curl toward the grain direction. Or simply flex it—it bends more easily along the grain.
I’ve watched a production manager lose two hours troubleshooting a “bad batch” of foil, only to discover he’d accidentally switched from a standard pigmented foil to a clear holographic foil with a different activation temperature.
Here’s a quick reference from shop-floor experience:
| Foil Type | Activation Temp Range | Pressure Sensitivity | Best For |
|---|---|---|---|
| Standard metallic (gold/silver) | 110-130°C | Medium | General luxury boxes |
| Pigmented (matte colors) | 120-140°C | High (needs a smooth surface) | Invitations, art prints |
| Holographic/pattern | 100-120°C | Low—pressure creates ghosting | Accents, security features |
| Clear/transparent | 130-150°C | Very high | Embossing-only effects |
| Soft-touch metallic | 115-125°C | Medium-low | Cosmetic packaging |
Keep a log for each foil type you use. Write down the exact temperature, pressure, and dwell time that worked. What works for standard gold from one brand may fail for the “champagne gold” from another.
Invitations are usually thin—200-300gsm at most. They’re also often double-sided, meaning foil on the front shouldn’t show through to the back.
This requires two things:
1. A perfectly sharp die. Dull edges crush the paper rather than cut the foil cleanly. The result: a fuzzy, irregular line that looks amateur.
2. Minimal pressure with exact registration. Too much pressure creates a visible “kiss mark” on the reverse side.
A good field test: Run ten invitations. Flip them over. If you can feel any texture or see any color change on the back, reduce pressure by 10% and run another test. Repeat until the back feels smooth.
For high-end invitation studios, some automatic foil stamping equipment includes programmable pressure curves that can taper the force for the first 0.1 seconds (to position the die without impact) before applying full stamping pressure. That two-stage approach eliminates bounce and reverse-side marking.
Rigid box components are thick—often 1.5-3mm chipboard wrapped in paper. The challenge here is different: heat penetration.
Thick boards suck heat away from the stamping zone. If your heater can’t compensate, the foil adhesive never fully activates. You’ll get a “cold peel”—the foil transfers, but scrapes off easily with a fingernail.
The fix is not higher temperature (which scorches the surface) but longer dwell time with recovery heat between stamps. Machines with closed-loop temperature control monitor the platen between cycles and add brief heating bursts to maintain the setpoint even when thick material draws heat away.
Here’s a practical decision framework based on actual shop data:
| Monthly Volume (foil-stamped pieces) | Best Approach | Rationale |
|---|---|---|
| Under 1,000 | Manual or semi-auto press | Short runs don’t justify automation |
| 1,000 - 5,000 | Semi-auto with preset storage | You’ll change jobs often; you need repeatability without full automation |
| 5,000 - 15,000 | Fully automatic, single machine | Labor savings and consistent pay for the upgrade |
| Over 15,000 | Multiple automatics or a high-speed integrated system | Throughput and redundancy matter |
The inflection point for luxury work is actually lower than for commercial work, because the cost of a single ruined luxury box (5−20)ismuchhigherthanacommercialcarton(5−20)ismuchhigherthanacommercialcarton(0.50-2). So the payback on precision automation comes faster.
You can explore automatic configurations designed for mixed-material luxury runs that include programmable pressure and multi-zone temperature control.
After years of watching shops succeed or struggle, I’ve concluded there’s one rule that separates the two:
Don’t set up your machine for the average box. Set it up for the worst one.
Luxury production is judged by its failures, not its successes. A run of 1,000 wedding invitations with 10 bad sheets is a 99% success rate—but those 10 couples won’t care about your statistics.
So when you dial in temperature and pressure, run your test on the thickest part of the sheet, the most textured substrate, or the smallest font in your design. If the hardest spot stamps correctly, everything else will follow.
If you’re consistently chasing settings between jobs, consider equipment with job memory storage. Being able to recall “Invitation - cotton 300gsm - gold foil - pressure curve #3” eliminates the setup guesswork entirely.
For shops serious about scaling luxury production, review temperature zoning and pressure presets that store up to 50 material profiles. And for high-volume invitation work, see how automated foil feeding reduces waste between sheets.
GET A QUOTE